How to Record the Screen on Windows 11 (4 Methods)
I believe Windows, and Windows 11 in particular, is the most feature-rich and versatile desktop OS out there, easily outranking macOS, Linux, and Chrome OS. However, it’s a shame that Windows 11 still does not feature a built-in tool to record the screen. Even Windows 10 doesn’t have it, so we compiled a list of the best screen recording software for Windows 10. By the way, if you didn’t know, macOS and Chrome OS already come with a robust screen recording tool, and I love using them. But if you are a Windows user, we bring you four easy and free-to-use tools to record the screen on Windows 11 in this guide. You can record the screen on your Windows 11 PC with audio support, no watermarks, or without any limitation. So on that note, let’s check out these solutions.
Record the Screen on Windows 11 (2022)
We have included four easy and free methods to record the screen on Windows 11. We have used Xbox Game Bar, OBS Studio, and Free Cam to record the screen on Windows 11. And the fourth way will be especially handy for students. You can expand the table below and check out the methods at your convenience.
Table of ContentsRecord the Screen on Windows 11 with Xbox Game Bar
While Windows 11, or Windows 10 for that matter, does not come with a built-in screen recorder, there is the Xbox Game Bar that lets you record the screen with ease. It’s meant to record gaming sessions, but you can use it to record other windows as well. The only con is that it does not record the screen when File Explorer is open, or you are on the Desktop, which is a bummer. But the best part is the performance. Just by using a keyboard shortcut, you can start the screen recording. No need to wait for encoding the video! With that said, let’s see how this method works:
1. First, make sure you are not on the Desktop. Now, open an app or window (not File Explorer) and use the Windows 11 keyboard shortcut “Windows + G“. It will open the Xbox Game Bar overlay.
2. Next, move to the “Capture” option from the menu available at the top of the screen.
3. If you do not see the “Capture” option, click on the “Widgets” menu and bookmark “Capture” (click the star icon next to Capture).
4. A small floating pop-up window will now open up. Here, click the “Start recording” button, and there you go! Windows 11 will start recording your screen instantly. Do make sure to turn on the microphone to record your voice alongwith the desktop audio. Moreover, you can use the “Windows + Alt + R” keyboard shortcut to start recording the screen directly.
5. To stop the recording, click the “Stop” button in the “Capture Status” floating window. The screen recording will be saved in your profile underC:\Users\yourusername\Videos\Captures.
Record the Screen on Windows 11 with OBS Studio
If you are not happy with Xbox Game Bar’s limitations and wish to record the Desktop and File Explorer without any restrictions, then OBS Studio is the best program for screen recording on Windows 11 out there. It’s a free and open-source program that works like a charm and saves video recordings without watermarks. OBS Studio may look overwhelming, but stick to the tutorial below, and you will be able to record the screen on Windows 11 easily.
1. First, go ahead and install OBS Studio from the link right here. You can also install OBS Studio from the Microsoft Store (Free).
")
2. Next, open the software, and select “Optimise just for recording, I will not be streaming” in the first pop-up window. Keep all the other settings default and follow the on-screen instructions.
3. In the OBS Studio window, click on “+” under the “Sources” section, and select “Display Capture“. Following that, name the layer and press OK.
4. Now, click on “Start Recording” and OBS Studio will start recording the whole screen with audio. No need to configure anything to record audio. It’s enabled by default.
5. Once you are done, open OBS Studio and click on “Stop Recording“. The screen recording will be saved at the following location on your Windows 11 PC –C:\Users\yourusername\Videos.
6. In case you want to record a particular window or app in Windows 11, click on the “+” button under “Sources”, and select “Window Capture“. Following that, select the active window and start recording. That’s it.
Record the Screen on Windows 11 with Third-Party App Free Cam
If you are looking for something simple, Free Cam is probably the best third-party app to record the screen on Windows 11. It’s lightweight, free to use, has a minimal UI, and does not add a watermark to screen recordings. The app also includes a video editor with the option to reduce noise. The only complaint I have with Free Cam is that it exports videos in WMV format. No support for MP4. Nevertheless, here is how you can screen record on Windows 11 with Free Cam.
1. Go ahead and download Free Cam from here. After that, install the app as you would do with any executable.
2. Next, open Free Cam and click on “New Recording“.
3. After that, you can select the area you want to record or simply select the “Fullscreen” option from the drop-down menu. Make sure to enable the microphone and hit the red record button.
4. When you want to stop the recording, press “Esc” on your keyboard, and that’s it. The Free Cam app will the screen recording will open up. Here, you can edit the video or click on “Save as Video” in the menu ribbon at the top, and you are done.
Record the Screen on Windows 11 with Microsoft PowerPoint
If you are a student looking for the easiest way to record the screen on Windows 11, you can do so using Microsoft PowerPoint. Generally, students get an Office subscription through their schools or colleges, so this might come in handy for recording the screen. Here is how to go about it.
1. First, press the Windows key and search for “powerpoint“. Now, open Microsoft Powerpoint.
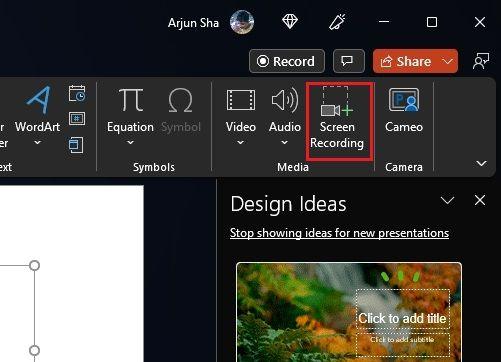
2. Then, move to the “Insert” tab from the menu bar. Here, look for and click the “Screen Recording” option at the top-right corner.
3. You will now be asked to select the area to record the screen. The microphone is enabled by default, so you can also record your voice via this method to record the screen on Windows 11 computers. Now, select the area of a window or the whole screen.
4. Finally, click the “Record” button, and the screen recording will start. And press “Windows + Shift + Q” to stop the recording when you are done.
5. The screen recording will be automatically added to your PowerPoint presentation. Now, to save it locally, right-click on the video and select the “Save Media as” option.
6. Next, save the screen recording to the Desktop or your preferred location, and you are done. The recording will be exported in MP4 format. So that is how students can record the screen on Windows 11 with Microsoft PowerPoint. That’s pretty cool, right?
Four Easy Ways to Record Your Screen on Windows 11
So these are the four ways you can use to record the screen on Windows 11. I have listed a native way to record the screen and three other methods, including one dedicated to students and two third-party tools. All the methods are free to use, don’t have any ads, and save the screen recordings without watermarks. Anyway, that is all from us. If you wish to learn how to take screenshots on Windows 11, head over to our linked guide to learn 8 different methods. And if you recently moved to Windows 11 and looking for hidden features in Windows 11, follow our list of features. Finally, if you have any questions, let us know in the comments section below.
TAGSScreen Recorder for WindowsWindows 11Leave a comment}})
George Washington
Lorem ipsum dolor sit amet, consectetur adipisicing elit. Ducimus itaque, autem necessitatibus voluptate quod mollitia delectus aut, sunt placeat nam vero culpa sapiente consectetur similique, inventore eos fugit cupiditate numquam!